Running a modern website is all about numbers. If you know how much traffic you’re getting, you’ll have a good idea of how well your blog is doing. However, that’s just one set of numbers. With a good analytics tool, you get access to plenty more data.
Blog analytics are all about empowering you to make informed decisions based on data. With the right tool, you’ll be able to take a look at almost everything visitors do on your site. If you know how to interpret that information, it can help you steer your blog in the right direction.
In this article, we’re going to talk more about what blog analytics are and how they can benefit you. I’ll also teach you how to connect your WordPress blog to Google Analytics in three short steps. Let’s get to work!
What Are Analytics (And How They Can Help You Grow Your Blog)

Analytics is a field that focuses on the interpretation of data. To put it another way, there’s a lot of useful information hidden in the way that people behave on the web.
For example, if you know how much time someone spends on a page, you can assume they found it interesting. However, that’s just a single data point, which may lead you astray. On the other hand, if you can average the time a hundred or a thousand people spend on a page, then you get a much clearer picture of how engaging it is.
That’s a single example of the type of information, you can glean from web analytics. Here are a few more:
- What links people are clicking on to get to your site.
- The way people move through your site’s pages.
- What your conversion rates are for specific goals.
- How many people are leaving your site immediately after coming in.
- What keywords are leading visitors to your content.
When it comes to growing a blog, having access to all that information is a goldmine. If you look at it critically, you should be able to determine what’s working and what isn’t as far as your site is concerned. Then you can use that information to course-correct or double down on successful approaches.
There’s a lot of work you need to do before you start thinking about web analytics though. If you’re still in the process of setting up your blog, I recommend you check out our Start a Blog guide, which will walk you through the entire thing. Once your blog is ready for the public, then it’s a good time to start collecting analytics. Let’s talk about how to do it.
How to Connect Your WordPress Blog to Google Analytics (In 3 Steps)
There are a lot of powerful analytics tools you can set up on your blog. However, I’m a big fan of Google Analytics since it’s free and offers you so much information it’s unlikely you’ll need to use anything else. Here’s how to get started with it.
Step #1: Set Up Your Google Analytics Account
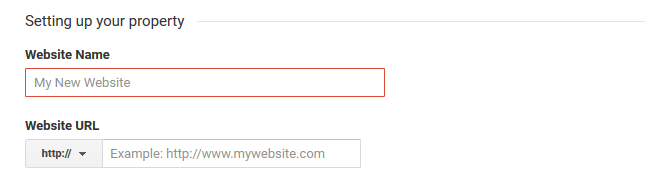
To use Google Analytics, you’ll need a Google account, which is to be expected. You probably already have one, so go ahead and visit the Analytics homepage and log in with it. Once you’re in, the platform will ask you to set up your first ‘property’ or website. First, you’ll need to enter your site’s name and URL:

Next up, Google will ask you to fill in some additional data, such as what industry your site falls under, what timezone you’re working from and the like:


Once you fill out all that data, you can click on the Get Tracking ID button. Your property is now set up. However, for Google to collect the data it needs, you need to connect that property with your website, which is where the tracking code comes in. We’ll get back to that in a minute, but for now, log into your WordPress dashboard.
Step #2: Set Up the GA Google Analytics Plugin
Connecting your Google Analytics account with your WordPress website involves adding a snippet of code to the latter. Once the code is on your site, Google can verify you own it and pull the data it needs from it.
The easiest way to do this is through a WordPress plugin. For this scenario, I like to use GA Google Analytics since it only takes a few minutes to set up and configure.
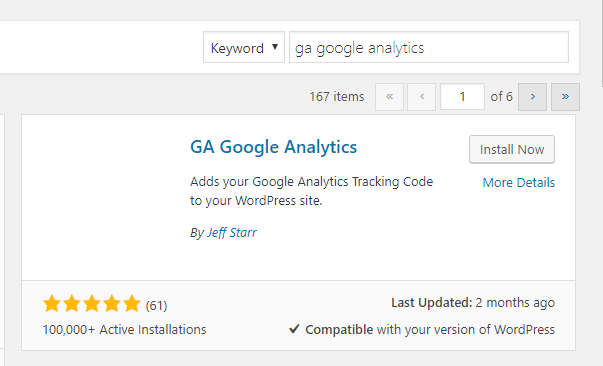
First off, go to the Plugins > Add New tab on your dashboard and look for the plugin using the search feature within that page. Once you find it, click on the Install Now button and activate the plugin:

After activating the plugin, navigate to the Settings > Google Analytics tab. Inside, look for the Plugin Settings section, and you’ll see a field that reads GA Tracking ID. Switch back to the Google Analytics dashboard now and look for your site’s tracking ID, which you got right after setting up the property. It should look something like this:
![]()

Copy and paste the tracking ID from Google over to your WordPress dashboard and choose the Universal Analytics option under Tracking Method:
![]()

Now scroll down and hit the Save Changes button and you’re good to go. If everything is set up correctly, you should start seeing information show up on your Google Analytics dashboard within a day or two.
Keep in mind – you need to collect significant amounts of data for it to have any meaning. If you’re only getting a few hits a day, then you need to be patient and not make rash decisions based on that.
In my experience, you can start getting the most out of analytics when you’re at the stage where you’re receiving at least 100 visits per day. At that point, your website is starting to gain traction, so the decisions you make are all the more important.
With blog analytics set up, you’ll know exactly when you hit that stage. More importantly, you’ll be primed to keep the momentum going, so it’s key you set up an analytics tool as soon as possible.
Conclusion
A lot of bloggers shy away from analytics because the field can be intimidating. However, having access to all the information a good analytics tool provides can lead you towards success. After all, it’s always better to make decisions based on data than on hunches.
As for what tool to use, I recommend Google Analytics. If you’re using WordPress, it’s downright simple to integrate:
- Set up a Google Analytics account.
- Get your Google Analytics tracking code.
- Set up the GA Google Analytics plugin.
Do you have any questions about how to use analytics to grow your blog? Let’s talk about them in the comments section below!