

For two days the site was either complete offline or in a rather mangled state. For two days my hosting provider and I worked our asses off to get LWB back online. It was an experience that I would rather not go through again, and one that I hope you will never have to go through.
With that in mind, in this post I want to outline the comprehensive steps I have taken to make my site more secure. I have spoken to some of the most influential and respected web security guys out there over the past couple of weeks and have been able to distill their wisdom into this post. It is my hope that you will take action on these steps to make your WordPress website(s) far more secure.
Why Websites Get Hacked
A lot of people seem to have it in their heads that hackers are mastermind plotters who manually seek out weak websites in an evil and calculated fashion (or something along those lines). While I’m certainly not one to defend hackers, that image is rather false in the vast majority of cases.
Sure — you do have hackers who will target a specific high-profile site for political reasons and so on, but unless you’re a BBC.co.uk or a Mashable you probably don’t need to worry about that. With the greatest of respect, your site probably isn’t big enough to be worth a hacker’s specific attention.
At the small/medium site level, hackers are generally looking to do one of two things:
- Use your website as a means of building a botnet of servers which they can use to do bigger and badder things
- Infect your website with malware that will drive search engine traffic etc. elsewhere
While there are some hackers out there who will hack sites just for the hell of it, they more often than not have an agenda. For instance, many hacked sites have their SEO meta data altered so that search rankings look like advertisements for pharmaceuticals, for which hackers can earn a healthy commission.
How Websites Get Hacked
When us “normal” folk get hacked it is typically the result of just one thing: an automated program exploiting a security vulnerability.
These vulnerabilities can be widespread or individual to your blog. Arguably the most high profile WordPress security vulnerability in recent years was the TimThumb saga, in which an image-resizing library used within many premium themes was exploited to gain control of a site.
On the other hand, hackers can used automated botnets to scour the web in search of websites that are vulnerable to “brute force attacks“ — i.e. the login details are obvious enough to allow a hacker to gain entry by attempting numerous logins. Imagine having all the time in the world to crack a digit-dial safe and you get the idea.
In reality, the fear of hacking gets blown entirely out of proportion. There is no bogey man waiting around the corner with the malicious intent of destroying your pride and joy. There are just those who indiscriminately target the weak. Therefore, all you need to do is make your site strong.
How to Protect Your WordPress Website
WordPress security is one of those topics that can get seriously overwhelming. You’ll get hit with a huge number of tips and tricks that will supposedly make your site more secure, but in reality you have no idea as the efficacy of those measures.
With that in mind, I want to take a different approach here. I’m going to run through the ten most effective steps you can take to secure you site. By acting on just these ten steps, your site will be far more secure than the vast majority of others out there, and even if your site is hacked, you’ll be in a position to restore it quickly and with minimum fuss.
Step 1: Backup


You must take this step first and make sure that you have a backup before you make any other changes to your site.
Nothing is more effective at securing your site than having backups. You can never make your site 100% secure — such a thing is not possible — but you can practically guarantee its safety by making sure that it is regularly backed up in a safe and reliable manner (and as such, can be restored).
In the past I have been rather lax with my backups process. I have taken backups but I’ve done it with a service that isn’t particularly reliable. In fact, I had to rely upon my hosting provider’s daily backup service to restore my site after it had been hacked.
Therefore, I knew that I had to upgrade to something bulletproof. After doing a fair bit of research I settled on VaultPress — made by Automattic, the same fine folks who help to develop WordPress. It takes a snapshot backup of my site every single hour and stores all of those backups in perpetuity:
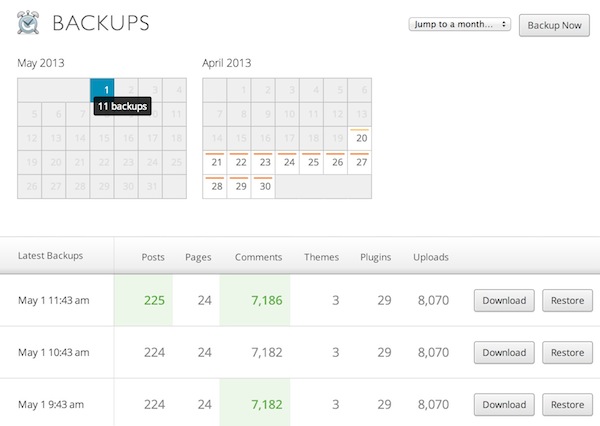

Not only that but VaultPress also offers a one-click site restore option, daily security scans, a comprehensive activity log, and more. All of this starts at just $5 per month (I’m subscribed to the premium $40 package).
I urge you to go with VaultPress. It’s not an affiliate link; I just think it’s a superb service.
Step 2: Update Everything
Okay, now let’s move onto some quick fixes that will dramatically improve the security of your site.
Rule 101 of site security is this: update everything regularly. I spoke to Dre Armeda, CEO and co-founder of Sucuri, and he highlighted it as the most important thing you can do to improve your site security (on any platform, not just WordPress).
And when I say update everything, I really mean everything:
- The WordPress Core
- All themes (including those that are deactivated)
- All plugins (including those that are deactivated)
WordPress has arguably the best team out there for spotting security vulnerabilities and patching them within a matter of days or even hours. All you need to do is keep up.
In an ideal world you would run updates as soon as they became available, but that may not be practical. I would recommend that you login once every day or two to run any pending updates.
Step 3: Clean House
An updated theme or plugin does not necessarily mean that it is safe. After all, you could have an “up-to-date” plugin that has in fact not been updated for two years.
So now’s the time to check over your themes and plugins and get rid of anything that is clearly no longer updated. As a rule of thumb I allow plugins that have been updated within the last year.
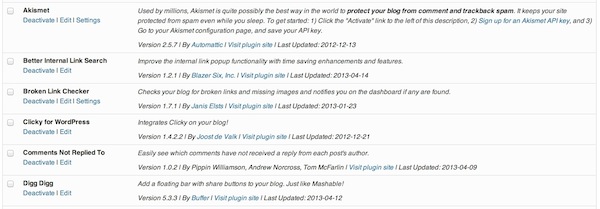
An easy way of spotting these plugins is to install Plugin Last Updated. This will show you the date upon which a plugin was last updated within the Plugins screen:

You should also get rid of any themes and plugins that you do not need. Whether active or otherwise, they still represent a potential security vulnerability and simply shouldn’t be there. The rule of thumb here is: if it’s not need for the site then it shouldn’t be on your site. It’s that simple.
Step 4: Manage Your Profiles
Head over to Users > All Users via your WordPress sidebar and you’ll be presented with a list of all active users on your site.
The first thing you should do is delete any redundant users. You can transfer the ownership of any posts written by that user to another user during the process.
Then downgrade any inappropriate roles for users. For instance, if you have contributors on your blog, they do not need Administrator access. Downgrade them to Author. This means that they will not have access to sensitive areas of your site’s backend.
Finally (and perhaps most importantly), get rid of your “admin” profile (if it’s still there). Many brute force attacks are based upon attempting to crack the password for “admin” accounts — if you change the name, you completely prevent the attack from being successful.
The easiest way to successfully delete your admin profile is to create a new Administrator profile, delete the old admin one and select the option to transfer all posts to the new profile. Please make sure that you have taken a backup before you attempt this!
Step 5: Change Passwords
When I say passwords, I mean all of them.
Now is the time to get your house in order and ensure that all of your accounts are safe from a brute force hacking attempt. Here is an incomplete list of the account passwords you should be changing:
- All WordPress profiles
- Your hosting account
- FTP
- Your email account
- Your social media accounts
- Your PayPal account
- Your Amazon account
You get the idea. Each password should be completely unique and used on only one site. And please do not use recognisable words in your passwords.
To create strong, unique and random passwords, I recommend that you use the LastPass Random Password Generator with the settings as follows:
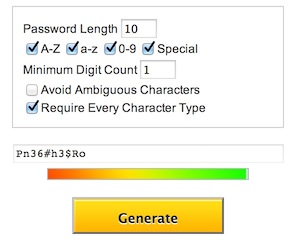

While you’re at it, get a free subscription to LastPass and use it to store all of those complicated passwords you’ve just created. Then you only have to remember one password to gain access to all of your accounts.
Step 6: Disable FTP (and Set Up SFTP)
Here’s something you may not know: FTP (File Transfer Protocol) is horribly insecure. In a nutshell, it transfers all files and data in an unencrypted format, which means that anyone who successfully intercepts it can see exactly what’s inside.
So get in touch with your hosting provider now and ask them to (1) disable FTP and (2) enable SFTP (SSH File Transfer Protocol). This is absolutely vital to the security of your site. After all, it doesn’t matter how secure your WordPress login is if hackers can get in via FTP. With FTP access they have everything they need to gain full control over your site.
Step 7: Consider Your Hosting Solution


First of all, their automated ModSecurity firewall system detected the incursion and immediately took the site offline, probably saving it from being defaced even further. Secondly, they worked their socks off to get the site back online, even though they were busy with many other folks who were facing the same issue. Finally, it was their daily backups that we relied on to get the site back online.
In a way it’s timely that this hack occurred, as it was only a few weeks ago that I published a glowing endorsement of Westhost here on LWB. I am glad that my faith has been rewarded.
Obviously I would recommend Westhost for hosting your site, but whoever you choose to go with, I recommend the following features:
- ModSecurity
- SFTP support
- 24/7 local telephone support
- Daily backups (having a backup for your backups is never a bad idea)
I cannot underestimate the importance of your hosting provider for any number of reasons, so make your decision carefully.
Step 8: Consider Security Plugin Solutions
WordPress security plugins are all the rage these days, which is rather unsurprising given the high-profile security issues revealed in the press recently. But a little birdie (whose opinion you’d do well to trust) told me that their role in website security is often blown out of proportion. Although certain WordPress security solutions can be useful, it is the previous seven steps that will make the greatest difference.
Although there are countless options available, I would narrow the selection down to:
They’re all very popular and highly rated. I personally use Wordfence but you may wish to take the time to consider the two alternatives. Regardless of which one you choose, they implement a lot of measures that will make your site that little bit more difficult to hack.
Step 9: Subscribe to Sucuri


In a nutshell, the aforementioned Sucuri regularly scans your website for malware and anything else untoward and takes instant action (with your permission) to restore your site to its intended glory within hours.
Like VaultPress it is another premium solution, but there is a reason for that — the service is top-notch. And let’s face it: $90 per annum (or $7.50 per month) is not a particularly big price to pay for a service that will constantly keep an eye on your site and restore it quickly if the worst should happen.
Step 10: Ensure that Your Computer is Secure
Finally, you should look closer to home to ensure that your site is safe from hackers.
Consider this: creating a highly unique password is potentially worth nothing if there is keylogger malware installed on your system. Therefore, you should strive to ensure that your computer is as secure as possible too.
The same principles covered above apply:
- Ensure that your OS and all software is regularly updated
- Delete anything that you don’t need
- Create strong, unique passwords
In addition, make sure that strong firewalls are set up between your computer and that you have a top-notch antivirus solution in place. Do not rest until you feel that your computer is as secure as it can be!
There is No Such Thing as 100% Secure
I am sure that some of you will have additional suggestions to boost website security and I welcome them in the comments section.
However, bear this in mind: there is no such thing as a 100% secure site. You could go on and on practically forever in an effort to improve the security of your website, but ultimately there comes a point where you decide that it is safe enough.
I believe that the ten step process I have outlined above will ensure your website’s safety against the vast majority of attacks, and perhaps most importantly, the high-profile attacks that you are probably worried about. WordPress security isn’t particularly complicated when you boil it down to the absolute fundamentals, which are all covered above.
If you have any questions or comments then please do not hesitate to fire away in the comments section below!